Monday, 7 October 2013

Kiosk Mode

Boot up to Webpage

1. Install chromium, x11-xserver-utils and unclutter

sudo apt-get update && apt-get upgrade -y
sudo apt-get install chromium x11-xserver-utils unclutter

2. We need to prevent screen from going blank and disable screen saver.
- edit /etc/xdg/lxsession/LXDE/autostart and comment # screen saver line and add those lines:

@xset s off
@xset -dpms
@xset s noblank
@chromium --kiosk --incognito http://some.web.


http://lokir.wordpress.com/2012/09/16/raspberry-pi-kiosk-mode-with-chromium/

Stop Raspberry Pi Going to sleep

I used simple steps and it perfectly worked for me:
  1. Open a root terminal in raspberry Pi. Now you need to edit your script that's starting X. In the default build with lightdm.
  2. Open "lightdm.conf" file located in,
    /etc/lightdm/lightdm.conf
  3. Add below line in to SeatDefault section.
    [SeatDefaults]
    xserver-command=X -s 0 -dpms
  4. Restart your Raspberry Pi.
Now issue should be solved.

Friday, 4 October 2013

Raspberrypi DNS Server

installation

Through the magic of Debian, installing dnsmasq is as simple as:
sudo apt-get install dnsmasq

configuration

For my setup, dnsmasq configuration happens in the following files: * /etc/dnsmasq.conf - dnsmasq specific configuration * /etc/resolv.conf - DNS to forward to (and the one used by the server running dnsmasq) * /etc/hosts - host names for static IPs * /etc/ethers - manually assigned IPs specified as MAC to IP mappings (optional)

/etc/dnsmasq.conf

This configures how the DNS server and the DHCP provider (if enabled) should behave. I'll discuss the main options I used, but the example configuration file provided with the install has good documentation.
Some domain lookups are essentially guaranteed to come up empty on the wider Internet. You can disable forwarding of them with the following lines:
# won't forward unqualified names (e.g. myserver)
domain-needed

# won't forward some non-routed addresses
bogus-priv

# won't forward requests for your intranet subdomain
local=/lan.mydomain.com/
That last one is key. It forces that subdomain to be resolved only via internal config: the hosts file or DHCP clients.
To specify the root subdomain for your intranet, use the following two options:
# append the domain (below) to all hosts in the hosts file
expand-hosts

# appended to DHCP hosts and, if above option specified, to hosts from static IPs
domain=lan.mydomain.com
If you want to use the /etc/ethers file (see section farther down) add this option:
read-ethers
The rest is DHCP config. I copied it from my router's dnsmasq config, so I don't know much about all of the options.
NOTE: If you do enable DNS via dnsmasq, you should shut off the DHCP on your router. After an IP refresh, your DHCP clients should all work fine.

/etc/resolv.conf

In my network, this points to my router. I would expect that is the normal setup, but your mileage may vary. The file's only contents are the IP of the DNS server to point to.

/etc/hosts

You'll want to leave the existing contents, but add the host names for any of your devices using static IPs. You do not need every device listed in here, just the ones you want to be addressable via a domain name.
Format is <IP> <host name>, and the host name should only be the lowest level qualifier of the host (not the full domain name). For example, if you want a device to be mydevice.lan.mydomain.com, only specify mydevice.
192.168.1.301 mynas
192.168.1.302 webserver

/etc/ethers

This is only needed if you have a few devices you want to assign static IPs to, but can't or don't want to configure the static IP on the devices themselves.
This is simply a <MAC> <IP> formatted file, with one mapping per line, for example:
00:00:00:00:00:00 192.168.0.200
00:00:00:00:00:01 192.168.0.201

final thoughts

As neat as it is, the benefits of domain names internally are pretty minimal. I already had the handful of static IPs I use memorized, but it will be nice to have a friendlier name to use. I do like having domains for the DHCP clients, however, since it removes the need to look up the IP beforehand.
Raspberrypi auto connect to wifi on boot up

Setting up a WiFi connection on the RaspberryPi

raspberrypi-wifi
I’ve recently tried to setup a WiFi connection with the RaspberryPi and encountered some issues: the connection didn’t start automatically and it wasn’t stable. I’m using an Edimax EW-7811Un USB dongle, which is supposed to be supported out of the box with Raspian Wheezy (2012-12-16).
After researching the issue, I finally have a configuration that works reliably. Here are the steps I’ve followed.

Setting up the configuration

Edit the /etc/network/interfaces file to look like this:
auto lo

iface lo inet loopback
iface eth0 inet dhcp

#auto wlan0
allow-hotplug wlan0
iface wlan0 inet manual
wpa-roam /etc/wpa_supplicant/wpa_supplicant.conf
iface default inet dhcp
Then add your WiFi parameters to /etc/wpa_supplicant/wpa_supplicant.conf.
Here are my parameters to connect to my freebox (French ISP router).
network={
        ssid="YOURSSID"
        scan_ssid=1
        key_mgmt=WPA-PSK
        proto=WPA
        psk="YOURPASSWORD"
}
At this point, the you should be able to start the connection with this command:
sudo ifup wlan0
In some cases, you might need to do sudo ifup wlan0 first.

Connect automatically when booting

To make the connection work when the RaspberryPi boots, I have added a few lines to /etc/rc.local (source) :
echo "Starting WiFi..."
wpa_supplicant -B -i wlan0 -c /etc/wpa_supplicant.conf
sleep .5s
dhclient wlan0
echo "WiFi should be started"

exit 0

Keep the connection alive

To make sure that the connection stays up, I’ve done two things.
First, disable the power management of the WiFi dongle. Create a new /etc/modprobe.d/8192cu.conf file with this content (source):
options 8192cu rtw_power_mgnt=0 rtw_enusbss=0
Then, make the RaspberryPi ping the router every minute. Open your crontab:
$ crontab -e
and add this line at the end :
*/1 * * * * ping -c 1 192.168.0.254
Replace the IP address by the actual IP address of your router.
It took me some time to get it right, but now the Pi connection seems to work fine.

Friday, 27 September 2013

Google Docs and Raspberry pi

Using the Pi With Google Docs

The Raspberry Pi is a great little bit of kit and wonderful for collecting sensor data.  However you can't analyse that data from the comfort of your office or home...If only there was some sort of Internet based Spreadsheet!

Well the good news is that the Pi is great with Python and there is a library especially created for this purpose. Install the gspread library and you can now easily create Spreadsheets for Google Docs.  Great news, huh!

Even better there's a full tutorial at:
http://learn.adafruit.com/dht-humidity-sensing-on-raspberry-pi-with-gdocs-logging/connecting-to-google-docs   This works with a humidty sensor, but it really shows the possibilities.

There are also some great tutorials for temperature sensors: http://www.danielhansen.org/2013/03/raspberry-pi-temperature-logging-using.html

And a printable: http://c-mobberley.com/wordpress/wp-content/uploads/2013/05/nutsvolts201305-rPi_temp_monitoring.pdf

Now anything the Pi can sense can be recorded into a Spreadsheet and accessed from anywhere!


taken from : http://raspberrypislice.blogspot.co.uk/2013/09/using-pi-with-google-docs.html

Basic Raspberry Pi Wifi SEtup

tep 1
Plug it in. Doesn’t matter which port – just plug the thing in.
Step 2
Boot it up. I’m assuming here you have used your Pi before and know how to get into an X session.
Step 3
On your desktop you’ll see an icon like this:

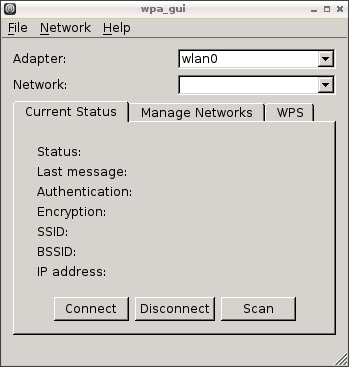
Double-click on it – you’ll see a new window launched entitled wpa_gui (you can also launch this by running sudo wpa_gui from the terminal). This is what it’ll look like:

Step 4
Now here’s where you actually have to do something. As you’ll notice in the image above, there is a single entry in the Adapter list – wlan0. This is the N150 wireless dongle (unless you have other wireless devices). If you see this, you’re OK to proceed.
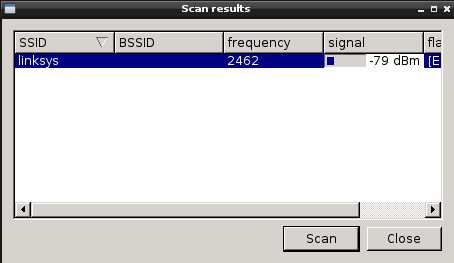
Next, click on the Scan button. This will bring up a new window:


Step 5
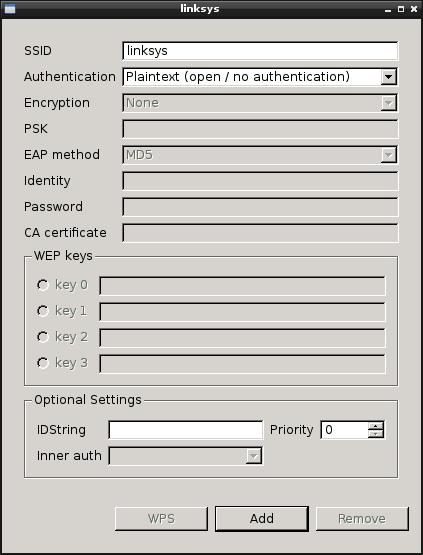
Once you have this window up and you can see your wireless network (you might need to click scan again), double-click on it. You’ll be presented with the following window:

Assuming you don’t want to change any settings (I use MAC filtering rather than encryption, so it was easy enough – I’m assuming it’ll be fairly straight-forward to set up encryption), just click on the Add button.  This will add the selected wireless network to a list you want be able to use.
Step 6
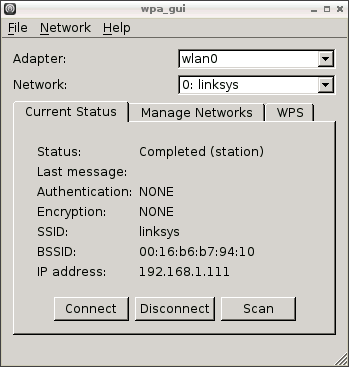
Once you’ve done this, close down this winder and the previous one until you return to the main wpa_gui window.  You’ll see you now have your wireless network in the Network list, and looking below that you’ll see a status of Completed (station).


And that’s pretty much it.  I’ve been using it all evening without any issue.  Hopefully this’ll get you up and running as easily as it did me

taken from : http://www.myraspberrypiexperience.com/

Minecraft for Raspberry Pi

The first iteration of Minecraft: Pi Edition is now available! And it’s completely free to download. We’re adding new features in due course, but thought you guys would appreciate us getting something out to you as soon as possible.
Daniel Frisk has provided the following instructions on how to get started.
  • Minecraft – Pi Edition runs on Raspbian “wheezy” with XWindows. If you need to set that up, visit http://www.raspberrypi.org/downloads and follow the detailed instructions within.
  • Boot up your Raspberry Pi with Raspbian. If you haven’t set XWindows to start automatically upon boot, type in “startx”.
  • Next click the icon for LXTerminal to open a new terminal window. Use the following commands (in bold) to download and launch:
To download it: click here or visit https://s3.amazonaws.com/assets.minecraft.net/pi/minecraft-pi-0.1.1.tar.gz
To decompress it: tar -zxvf minecraft-pi-0.1.1.tar.gz
To run it: cd mcpi
Followed by minecraft-pi
Read more about the Pi, and find out what you need to get started, at their official site and dedicated wiki.
Have fun!

taken from : http://pi.minecraft.net/

Amazon

Donate

Donate Towards More Raspberry PI's for Projects