Wednesday 30 September 2015

Build your own system tools

Our latest issue hit the shelves this week (as well as the Play Store, iTunes and Zinio) – here’s a sneak preview of what’s in store for you this month!

Systems Programming

With a big feature on building your own system tools, Mihalis Tsoukalos kicks off a series of articles designed to teach you how to do systems programming. This month we’re recreating some classic utilities so you can see how they’re made, and over the coming months we’ll be looking at file I/O, processes and threading, interprocess communication and more.

Systems Programing

Plasma Mobile

We spoke to lead KDE developer Sebastian KΓΌgler to find out more about the brand new Plasma Mobile, a mobile operating system built on the Ubuntu stack. Early test builds are available to flash now and Sebastian lays out the roadmap for a release next year.

Plasma Mobile

Raspberry Pi Music Visualiser

Liam Fraser shows us how to turn an LED strip into a music visualiser that changes colour in time with the energy of a song. Check out this video to see it in action!

Music Visualiser

Windows with Wine

Wine and PlayOnLinux are two great pieces of software that enable you to help anyone fully transition to Linux, giving you a means to natively run Windows software such as Photoshop or EA games – no dual booting, no virtualisation.

Windows & Wine


from Linux User & Developer - the Linux and FOSS mag for a GNU generation http://ift.tt/1KR9SRF
via IFTTT

Sunday 27 September 2015

Spinning a Pyrite Record for Art

Anyone with a record player is familiar with the concept of translating irregularities on a surface into sound. And, anyone who has ever cracked open a CD player or DVD player has seen how a laser can be used to reproduce sound digitally. Combining the two would be an interesting project in its own right, but [Dimitry Morozov] took this a couple of steps further with his pyrite disc sound object project.

DSC016533_1340_cPyrite discs, also known as pyrite suns or pyrite dollars, are a form of pyrite in which the crystallization structure forms a disc with radial striations. Pyrite discs are unique to the area around Sparta, Illinois, and are generally found in coal mines there. They have no real practical use, but are a favorite of mineral collectors because of their interesting aesthetics.

[Dmitry] received his pyrite disc from one such mineral collector in Boulder, CO, with the request that he use it for an interesting project. [Dmitry] himself specializes in art installations and unique instruments, and combined those passions in his pyrite disc sound object called Ra.

The concept itself is straightforward: spin the pyrite disc and use a laser to convert the surface striations into audio. But, as you can see in the photos and video, the execution was far from straightforward. From what we can gather, [Dimitry] used an Arduino Nano and a DIY laser pickup on a servo arm to scan the pyrite disc as it’s being spun by a stepper motor. That data is then sent to a Raspberry Pi where it’s synthesized (with various modulation and effects controls), to produce sound that is output through the single speaker attached to the object. Generating sound from unusual sources is certainly nothing new to regular readers, but the beauty of this part project is definitely something to be applauded.


Filed under: musical hacks

from Hackaday » raspberry pi http://ift.tt/1LUf8ne
via Hack a Day

Friday 25 September 2015

Raspberry Pi Weather Station In Progress

[Jeremy Morgan] is building a weather station from scratch using a Raspberry Pi, and he has put together a nice write up that shows where he is at, and how it works. Currently, his setup is in the breadboard stage and is measuring humidity, temperature, pressure and light level using sensors that connect over one wire and I2C. He also shows how he is using Google Docs to store the data, by getting the Pi to write to a Google Spreadsheet over email: the Pi emails the data to Google every 30 seconds.

There is an analysis portion, with a Microsoft Azure web site that graphs the data over time. It’s a bit of a dogs breakfast (he might have used one interface technology for all of the sensors, for instance), but it is still a nice overview of the overall process.

Automatically channeling data into an easily accessible medium has been the target of many hacks going way back. We’ve seen a ton of companies pop up to help satisfy the need but between those and the hacked together (usually) open source solutions, there doesn’t seem to be a clear winner. What’s your favorite method of gathering and displaying data from projects like this onto the web? Let us know in the comments.


Filed under: Raspberry Pi

from Hackaday » raspberry pi http://ift.tt/1JsGfEi
via Hack a Day

Wednesday 23 September 2015

Echo, Meet Mycroft

The Amazon Echo is an attempt to usher in a new product category. A box that listens to you and obeys your wishes. Sort of like Siri or Google Now for your house. Kickstarter creator [Joshua Montgomery] likes the idea, but he wants to do it all Open Source with a Raspberry Pi and an Arduino.

The Kickstarter (which reached its funding goal earlier this month) claims the device will use natural language to access media, control IoT devices, and will be open both for hardware and software hacking. The Kickstarter page says that Mycroft has partnerships with Lucid and Canonical (the people behind Ubuntu). In addition, they have added stretch goals to add computer vision and Linux desktop control to Mycroft.

With or without Mycroft, people are going to hack things like this together. If you dream of being able to start your teapot with the command “Computer. Tea. Earl Grey. Hot.” then Mycroft might be a pretty good leg up on getting started. We’ve also seen Echo integration with Roku and even Nest. We imagine an open platform would spawn a lot of interesting hacks. You can find out more about Mycroft’s plans in the video below.


Filed under: Crowd Funding, home hacks, Raspberry Pi

from Hackaday » raspberry pi http://ift.tt/1iM51KJ
via Hack a Day

Sunday 20 September 2015

Getting Biometrics in Hand

It is amazing how quickly you get used to a car that starts as long as you have the key somewhere on your person. When you switch vehicles, it becomes a nuisance to fish the key out and insert it into the ignition. Biometrics aims to make it even easier. Why carry around a key (or an access card), if a computer can uniquely identify you?

[Alexis Ospitia] wanted to experiment with vein matching biometrics and had good results with a Raspberry Pi, a web cam, and a custom IR illumination system. Apparently, hemoglobin is a good IR reflector and the pattern of veins in your hand is as unique as other biometrics (like fingerprints, ear prints, and retina vein patterns). [Alexis’] post is in Spanish, but Google Translate does a fine job as soon as you realize that it thinks “fingerprint” is “footprint.” The software uses OpenCV, but we’ve seen the same thing done in MATLAB (see the video below).

Fingerprint scanners looked promising, but there are concerns about them. They are easy to spoof and if they aren’t sophisticated enough, they are subject to a literal hack (we don’t want someone lurking around the ATM machine with a pair of bolt cutters). We figure a severed hand won’t have enough blood in it to fool this system, but we aren’t willing to test that theory.

There are commercial systems that use similar technology from Fijitsu, Toshiba, and others. We have to wonder if there are other places you might have unique vein patterns that would be useful to scan. We’ve talked about fingerprint scanners before, and while we’ve covered someone spoofing a hand scanner, we don’t think that method would work with this particular setup.


Filed under: Raspberry Pi, security hacks

from Hackaday » raspberry pi http://ift.tt/1NEXcRW
via Hack a Day

Saturday 19 September 2015

Hacking a Pi Camera with a Nikon Lens

Cell phones have killed many industries. It is getting harder and harder to justify buying an ordinary watch, a calculator, or a day planner because your phone does all those things at least as well as the originals. Cell phones have cameras too, so the days of missing a shot because you don’t have a camera with you are over (although we always wonder where the flood of Bigfoot and UFO pictures are). However, you probably still have a dedicated camera tucked away somewhere because, let’s face it, most cell phone cameras are just not that good.

The Raspberry Pi camera is about on par with a cheap cell phone camera. [Martijn Braam] has a Nikon camera, and he noticed that he could get a Raspberry Pi camera with a C-mount for lenses. He picked up a C to F adapter and proceeded to experiment with Nikon DSLR lenses on the Raspberry Pi camera.

You’d think the pictures would be great, right? They are good, but [Martijn] found that the Pi’s sensor actually compensates for color effects found in the little cheap lenses it would usually have. That threw the color of the shots off when used with an expensive DSLR lens. Of course, there’s plenty of color correction software.

The lenses are generally made to hit a bigger sensor, too. That means the Pi camera gets a cropped view of what a DSLR would with the same lens.

Is it practical? We don’t know what we’d use it for. But it certainly is a hack, and we like that. If you want something more practical, maybe use the Pi to control the whole DSLR (see video below). Of course, some people want more than one lens, and we know some people would find [Martijn’s] choice of lens just too modern.


Filed under: Raspberry Pi

from Hackaday » raspberry pi http://ift.tt/1MiEa24
via Hack a Day

Thursday 17 September 2015

Tiny Headless Servers Everywhere

Quick, what do “cloud compute engines” and goofy Raspberry Pi Internet of Things hacks have in common? Aside from all being parody-worthy buzzword-fests, they all involve administering remote headless (Linux) installations. It’s for exactly that reason that a new Ubuntu distribution flavor, Ubuntu (Snappy) Core, targets both the multi-bazillion-dollar Amazon Elastic Compute Cloud and the $55 BeagleBone Black.

If that combination seems unlikely to you, you’re not alone. But read on as we hope to make a little more sense of it all.

Hacker Hardware History

When rumors of the Raspberry Pi first hit the scene in 2011, it was marketed as the solution to the world’s computer literacy woes — at $25 per computer every child in the world could have one at their fingertips. (Nevermind the price of a keyboard, monitor, HDMI cable, mouse, power supply…) Nobody was thinking that we were in for an army of headless Linux servers, but that’s exactly what happened.

There were other small computers around; at the time, the BeagleBoard was the hotness on the single-board computer (SBC) front, but it was expensive enough that only the committed and nerdy were using them. We had one hooked up to a hard drive and an external DAC as the center of our stereo system at the time. The system was a little bit clumsy in that we occasionally had to haul out a screen and keyboard to perform maintenance on the thing, but overall it worked just fine as a multimedia hub.

Then the Raspberry Pi came out at around a fourth of the price of the BeagleBoard, and something funny happened. Instead of being the solution to the world’s computer needs, the Raspberry Pi ended up working its way into the same project-space that the Arduino had inhabited. Maybe it was the price point and form factor.

debugging
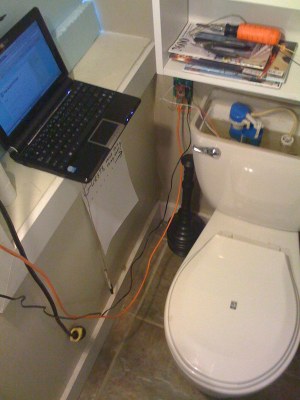
For example, one can’t deny that a Twittering Toilet is a necessity of the modern era. (Don’t blame us! It was the Zeitgeist.) On the other hand, getting your Arduino connected directly to the Internet was fairly difficult at the time — and so it’s no surprise that the Arduino senses flushes and communicates with a real computer that takes care of the Twittering.

The Raspberry Pi changed that. They’re cheap enough that you can dedicate one to the toilet without only minor pangs of guilt. So not long afterward, we have Raspberry Pis in toilets and chicken coops rather than in grade-school curricula.

These type of projects don’t use the device as a “computer” at all. Indeed, of the bazillions of Raspberry Pi projects we see here at Hackaday, how many of them have attached screens, keyboards, and mice? Very few, aside from the MAME builds and emulated Amigas stuffed into their own floppy drives.

Or have a look at the Beagle family. The BeagleBoard (2010) was a full-fledged single-board computer (SBC); you could plug in a monitor and keyboard. Then came the bare-bones (and slightly less expensive) version: the BeagleBone (2012). Signalling that it was meant for embedded applications rather than being a standalone computer, it had no video output and was a bit cheaper. It was a success.

Even less expensive, the BeagleBone Black (2013) again picked up an HDMI port, because, heck, why not? And as if to answer that question, the newest BeagleBone Green replaces the video out with some I2C peripheral connectors, reaffirming the device’s intent as an embedded computer rather than a mini-desktop.

So which do you want for your projects? A recent survey at Linux Gizmos asking their readership to rate their favorite single-board computers turned up no surprises on the popular-brand fronts: the Raspberry Pi is most popular, followed by the BeagleBone Black, followed by the Odroid offerings.

More interestingly, they also asked folks what applications they’re putting their SBCs toward. The results, in order:

  1. home automation
  2. special function servers
  3. home multimedia
  4. education
  5. robotics / vehicles
  6. data acquisition / control
  7. HMI / industrial
  8. “other”
  9. kiosks

This matches our gut feeling about what the average Hackaday hacker is interested in as well, so we’ll buy it.

Looking over the application list, how many of the project applications require a keyboard, monitor, and mouse? How many are traditional “computer” applications? Let’s say some fraction of “education” and probably all of “kiosks”. The rest of the applications are either standalone, run over the network, or are probably best served by a small LCD at most. In short, they’re embedded projects that benefit from the connectivity and ease of development that a (tiny) real computer brings to the table.

So What?

rpi-pandora-radioThe point of this recent-history lesson is that if you make a computer cheap enough, it becomes an embedded device because nobody can turn down cheap Internet or USB connectivity, or a pleasant development environment, or even just interpreted programming languages with broad-ranging library support. If web-scraping is part of the device’s functionality, you’re not going to want to code that up on an 8-bit microcontroller. And so formerly-Arduino applications get amped up with Raspberry Pis, and our comments section overflows with people decrying “overkill”.

But more to the point, we’re seeing embedded Linux systems inside projects where it’s difficult to get at the HDMI port, or where you just don’t want to schlep a monitor. These are headless Linux systems that aren’t sitting in racks in some server room, but instead under the nightstand in your bedroom. And the humble hardware-hacker is looking at the remote administration of a headless networked server, which sounds like an entirely different job description.

Running Headless: The Software Catches Up

So if the Internet of Things is going to be an internet of headless Linux boxes, isn’t it time our software / operating systems caught up? No more of this GUI configuration menu crap — that’s for desktops that have the luxury of monitors. What you need, once you’ve got your Raspberry Pi or BeagleBone sitting deep inside some box somewhere, is quick and easy deployment and network-based remote administration of the tiny headless Linux server that lies within. And until you’ve got its web server or VNC up and running, that means spending some quality time with the console.

Queue the parallel development in the “cloud” world. The need to quickly spin up machines on servers has put a premium on ease of installation and updating of complete systems using simple and powerful command-line tools. In particular, the ability to create a system, save the configuration and installation details, and then replay them back into another instance has become a lot easier in the last five years. See containers and Docker and all that jazz.

snappy-webcam-appliance
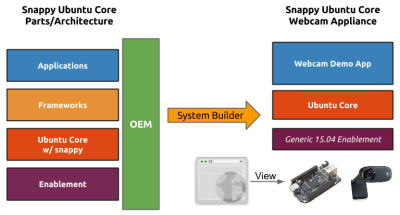
Back in the embedded world, the Ubuntu Core documentation goes through an example of setting up a webcam on a BeagleBone Black and then replaying that configuration back, potentially to a completely new installation. If sharing your embedded appliance with the world means conveying all sorts of system and application configuration details, it’s great to have tools to make this easier.

Finally, installing security patches is the hot-topic bugbear of the IoT world right now. Nobody wants network-connected devices sitting around in their home network with buggy security implementations, yet so many IoT devices are flashed with firmware that’s inflexible and/or difficult to update. A major advantage of the convergence of “cloud” with embedded tech is that the devices get the benefit of easier, hands-off security update mechanisms.

Conclusion

The unlikely marriage of software tech from “cloud appliances” with our hacked (non-metaphorical) appliances is just starting, and we think it’s actually going to benefit us hardware types. Granted, it’s partly semantic, but we think that recognizing your Twittering Toilet as a headless Linux server could bring increases in reproducibility and security, as well as convenience.

What do you think? Was the Raspberry-Pi-as-miniature-desktop-computer idea doomed from the very start? Would increased ease of installation and administration push some of you microcontroller die-hards into the microcomputer camp? Are you a distributed Linux sysadmin because you have four BeagleBones in your home automation setup? Or have we been philosophizing too much in our beer?

[Photos of boards courtesy: BeagleBoard Foundation and Lucasbosch]


Filed under: Featured, linux hacks

from Hackaday » raspberry pi http://ift.tt/1QJ7LDq
via Hack a Day

Monday 14 September 2015

Hackaday Prize Semifinalist: An Open Smartphone

One of the biggest trends in DIY electronics, both now and fifty years ago, is creating at home what is usually made in a factory. Fifty years ago, this meant radios and amplifiers. Today, this means smartphones. It used to be the case that you could pull out a Heathkit catalog and find kits for every electronic gadget imaginable. There are no kits for DIY smartphones.

For [Gerard]’s entry for The Hackaday Prize, he’s tapping into the spirit of the decades-old DIY movement and building his own cell phone. He’s calling it the libresmartphone, and it’s able to make calls and send emails, just like any other portable, pocketable computer.

The libresmartphone is built around a Raspberry Pi, with a large battery, HDMI display with touchscreen, and a GSM and GPS module rounding out the build. He’s also rolling his own software to make calls, read SMS, and take a peek into some of the phone’s hardware, like the charge state of the battery.

[Gerard]’s libresmartphone is one of the purest examples of modern DIY electronics you’ll find; it’s not about building something from a kit, but instead building something that’s needed out of the parts he has on hand. That’s the purest example of the DIY movement, and a great entry to this year’s Hackaday Prize.

The 2015 Hackaday Prize is sponsored by:


Filed under: The Hackaday Prize

from Hackaday » raspberry pi http://ift.tt/1KhhR9m
via Hack a Day

Sunday 13 September 2015

Sense Hat Lights up Pi

One of our chief complaints about the Raspberry Pi is it doesn’t have a lot of I/O. There are plenty of add ons, of course to expand the I/O capabilities. The actual Raspberry Pi foundation recently created the Sense Hat which adds a lot of features to a Pi, although they might not be the ones we would have picked. The boards were made for the AstroPi project (the project that allowed UK schools to run experiments in space). They don’t appear to be officially for sale to the public yet, but according to their site, they will be selling them soon.

The board has an ATTiny, but it is not supposed to be user programmable (we smell future hacks here, though). There is a Python API and, presumably, the CPU is running something like Firmata. The most obvious feature, though, is an 8X8 RGB LED matrix. This can be used for (very low resolution) graphical output or scrolling text. There’s also a five-button joystick and  a host of I2C sensors including an inertial measurement sensor as well as pressure, humidity and temperature sensors. In addition, there are several 3D sensors including an accelerometer, a gyroscope, and a magnetometer.

Need more conventional I/O? You might want to homebrew your own expansion if your needs or more analog, or even just enslave an Arduino.

The hat has an odd mix of devices, but lots of interesting possibilities. We wish we could just stick to one word instead of hats, shields, capes, and everything else vendors keep inventing. We keep suggesting “leech” but no one’s marketing people will let that one get past them. We’d settle for daughter board.

Since only a few people have the hats from the first run, there aren’t many projects out there yet. But see the video below, including the one that uses the 8X8 matrix for the first thing we thought of when we saw it: Conway’s game of Life.


Filed under: ATtiny Hacks, linux hacks, Raspberry Pi

from Hackaday » raspberry pi http://ift.tt/1FFCjQj
via Hack a Day

Traffic Light tells you if the Internet is up

Some of us are not blessed with an always on, high availability internet connection. Sick of answering the constant “Is the internet up?” questions, go-to IT support dude [PatH] took matters into his own hands and developed an unmistakable traffic light display of internet status for his apparently low-reliability connection.

A toy traffic light from Amazon forms the core of the UI, and the lights are driven by a Raspberry Pi that pings a suite of 10 sites in round robin fashion. If a site is found to be unavailable, the Pi goes into “deep probe” mode to determine the extent of the outage, and lights up accordingly. If the light is green, the connection’s clean; if it lights up red, best go to bed. As a bonus, logs are kept of all deep probes, which may prove useful for diagnosing ISP issues.

A display like this could go a long way toward making sure you stay connected, and can reduce the workload for you as de facto IT support. Of course for a little more information about the connection speed with retro styling, you might want to throw a Dekatron at the job.


Filed under: internet hacks, Raspberry Pi

from Hackaday » raspberry pi http://ift.tt/1K6bvg4
via Hack a Day

Tuesday 8 September 2015

Finally, an Official Display for the Raspberry Pi

Yes, finally, and after years of work and countless people complaining on forums, there is a proper, official display for the Raspberry Pi.

It’s a 7-inch display, 800 x 480 pixel resolution, 24-bit color, and has 10-point multitouch. Drivers for the display are already available with a simple call of sudo apt-get update, and the display itself is available at Newark, the Pi Store (sold out) and Element14. There’s even a case available, and a stand ready to be sent off to a 3D printer.

As for why it took so long for the Raspberry Pi foundation to introduce an official display for the Pi, the answer should not be surprising for any engineer. It’s EMC, or electromagnetic compliance. The DPI (Display Parallel Interface) for the Pi, presented on the expansion header and used by the GertVGA adapter allows any Pi to drive two displays at 1920 x 1024, 60FPS. This DPI interface is an electrical nightmare that spews RF interference everywhere it goes.

raspberry-pi-touchscreen-thumbThe new display could have used the DSI (Display Serial Interface) adapter, or the small connector on the Pi that is not the camera connector. DSI displays are purpose-built for specific devices, though, and aren’t something that would or should be used in a device that will be manufactured for years to come. The best solution, and the design the Raspberry Pi foundation chose to go with, is a DPI display and an adapter that converts the Pi’s DSI output to something the display can understand.

The solution the Pi foundation eventually settled on is an adapter board that converts the DSI bus to DPI signalling. This of course requires an extra PCB, and the Foundation provided mounting holes so a Pi can connect directly to it.

While this is the first display to make use of the DSI interface, it will assuredly not be the last. The Pi Foundation has given us a way to use the DSI connector to drive cheap DPI displays. While the 800×480 resolution of the official display may be a bit small, there will undoubtedly be a few hardcore tinkerers out there that will take this adapter board and repurpose it for larger displays.

[Alex Eames] got his hands on the Pi Display a few weeks ago, you can check out his introductory video below.


Filed under: Raspberry Pi

from Hackaday » raspberry pi http://ift.tt/1VM1km0
via Hack a Day

Sunday 6 September 2015

It’s an Upright Piano, It’s a Looper, It’s a Pi Project

We don’t really get out much, but we have noticed that there are brightly painted upright pianos in public places these days. Research indicates that these pianos are being placed by small, independent local organizations, most of which aim to spread the joy of music and encourage a sense of community.

[Sean and Mike] took this idea a couple of steps further with Quaver, their analog looping piano. Both of them are maker/musicians based in Lancaster, Pennsylvania, which happens to be a hot spot for public pianos. [Sean and Mike] often stop to play them and wanted a good way to capture their impromptu masterpieces. Quaver is an antique upright that has been modified to record, save, loop, and upload music to the internet. It does all of this through a simple and intuitive user interface and a Raspi 2. Quaver works a lot like a 4-track recorder, so up to four people can potentially contribute to a song.

The player sits down, cracks their knuckles, and presses our personal favorite part of the interface: the giant, irresistible record button. A friendly scrolling LED matrix display tells them to start playing. Once they are satisfied, they press the button again to stop the recording, and the notes they played immediately play back in a loop through a pair of salvaged Bose speakers from the 1980s. This is just the beginning of the fun as you play along with your looping recording, building up several voices worth of song!

The development of Quaver was not without its problems. Pianos are difficult to mic in any environment, especially the echo-prone food court of your average shopping mall. Because a piano’s soundboard is so large, the sound is never focused in any one place. An electronic engineer named [Ezra Charles Helpinstill] created electromagnetic bar pickups in the early 1970s, and named them after himself. They quickly became the amplifying device of choice for piano stars like [Elton John]. Helpinstill pickups attach to the piano soundboard with magnets and clamps. They only sense vibration, so there is no need to worry about feedback.

Amplification wasn’t the only issue they encountered. When a user resets the piano, the Pi reboots. This can take up to 30 seconds in standard Raspbian, which wouldn’t work well in a public setting. People would quickly lose interest and walk away. [Mike] ended up compiling his own Linux kernel using Buildroot and was able to get the boot time down to an admirable 2.9 seconds.

Check out the Quaver video demo and then go listen to the loops that people have uploaded.


Filed under: musical hacks, Raspberry Pi

from Hackaday » raspberry pi http://ift.tt/1LRJPfx
via Hack a Day

Saturday 5 September 2015

Orange is the New ($15) Pi

When the Raspberry Pi came on the scene it was hard to imagine that you could get a fairly complete Linux system for such a low price. The Pi has gotten bigger, of course, but there are still a few things you miss when you try to put one into a project. Wifi, comes to mind, for example. The first thing you usually do is plug a Wifi dongle in, consuming one of the two USB ports.

The Orange Pi is a direct competitor and has a few variants. Originally, the board cost about $30 but sports WiFi, a 1.6 GHz processor, 8 GB of flash, and a SATA interface. There’s now a reduced version of the board for about $15 that deletes the flash and SATA along with the WiFi and one of the original’s 4 USB ports. Still, the Raspberry Pi doesn’t have built-in flash. And the $15 Orange Pi PC has the things you’d expect on a Pi (HDMI and Ethernet) along with other extras like an IR receiver and an on-board microphone. Not bad for $15 considering it has a quad-core processor, a GPU and 1GB of RAM.

The Orange Pi PC is compatible with the operating system loads intended for its big brother, so you can run Lubuntu, Android, Raspbian, and more. You can find some manuals and other tools there as well. Of course, if you are looking for community support, you’ll probably find more Raspberry Pi users, forums, and projects–at least for now.

You can see Debian running on a very similar Orange Pi in the video below. The actual hardware in use is the Orange Pi Mini 2, which has an extra USB port, but is otherwise nearly identical to the PC. Personally, for most projects we’d rather spend a little more and get the onboard WiFi (just about every Raspberry Pi project we cover has Wifi). But if you don’t need WiFi, it is hard to beat $15 for a pretty capable little single board computer.


Filed under: linux hacks, Raspberry Pi

from Hackaday » raspberry pi http://ift.tt/1NTFuM5
via Hack a Day

RaspiDrums Uses Expensive Sensors

Piezoelectric sensors are great for monitoring mechanical impacts with a microcontroller. Whether you’re monitoring knocks on a door or watching a heartbeat, they are a cheap way to get the job done. They do have their downsides, though, so when [Jeremy] wanted to build an electronic drum set, he decided to use more expensive accelerometers to measure the percussive impacts instead.

Even though piezo sensors are cheap, they require a lot of work to get them working properly. The ADXL377 3-axis accelerometer that [Jeremy] found requires much less work, plus provides more reliable data due to a 1kHz low-pass filter at the output. In his setup, a Raspberry Pi handles all of the heavy lifting. An ADC on each drum sends data about each impact of the drum, and the Raspberry Pi outputs sound via the native Alsa driver and a USB sound card.

This project goes a long way to show how much simpler a project like this is once you find the right hardware for the job. [Jeremy]’s new electronic drums are very well documented as well if you are curious about using accelerometers on your newest project rather than piezo sensors. And, if you’re into drums be sure to see how you can have drums anywhere, or how you can build your own logic drums.


Filed under: musical hacks

from Hackaday » raspberry pi http://ift.tt/1NTgNPS
via Hack a Day

Thursday 3 September 2015

Robotics – take a free online course

Robotics – take a free online course

We’ve looked at robots a few times here at Linux User & Developer, from our very first from-scratch build with a Dawn Robotics kit in issue 132 through to robotics kit reviews, tutorials on the 3D-printed Rapiro and programming guides for last year’s Pi Wars challenges. It’s an incredibly exciting field that’s expanding all the time, especially with the rise of drones more recently that’s driving interest in the field, but if you’re coming to it all for the first time then it can be tough to know exactly where to start.

Fortunately, FutureLearn has you covered with a free online course due to start on 21st September. It’s a MOOC – a massively open online course – and FutureLearn is a widely respected platform for MOOCs with over two million users, connecting you with content from leading universities and specialists.

Begin Robotics is an excellent course provided by the University of Reading that gives you a solid grounding in robotics, encompassing a history that stretches back to musical automata in 13th Century Iraq, a hands-on introduction to the anatomy and individual components of a robot, and an examination of the future of robotics and the philosophical implications of the potential they have to change our world forever.

The course should take about four weeks, based on an average of three hours per week, and all you need is your Chrome, Firefox or Opera browser to dive right in, plus an account on the FutureLearn platform (you can sign up here).

If you’re interested in robotics but have never quite found the time to begin exploring the field, or you have some inquisitive young minds at home who want to take their Raspberry Pi skills to the next level, we definitely recommend giving this a shot.


from Linux User & Developer - the Linux and FOSS mag for a GNU generation http://ift.tt/1XjwjaN
via IFTTT

Amazon

Donate

Donate Towards More Raspberry PI's for Projects